Replacing the Receiver
The receiver on the Ericofon is permanently
glued into the case of the phone. It can be replaced relatively easily, but it's a
delicate process and must be done carefully or the phone will be scared from the
"surgery".
You can use just about any standard receiver
element in this phone. The best thing to do is go to a thrift store and buy an old Western
Electric Trimline phone (about 3 bucks) and rip the receiver out of that. I do sell
receivers also (shameless plug alert).
I will describe below the method I have
developed for replacing the element. Phones can vary a bit, what you find inside may look
a little different, but it's all pretty much the same process. The phone I have used in my
example is a North Electric model.
There are no guarantees with this method.
There is always the possibility that the plastic will break, that's a chance you will have
to take.
Before I start, there are a couple of warnings
I should let you in on that I have learned from experience. First off, the flat earpieces
are nearly impossible to remove without doing severe damage to the phone. The wedge shaped
earpieces are relatively easy to pop off. My guess is they changed the glue used when they
changed earpiece design (for more on earpiece design, see the section on "cases"
in the "colors and styles" area). The second warning is that not just any
receiver will work in the case of an Ericotone tweeter. If your phone has no ringer, or
has a buzzer, you are free to use any receiver. It seems though, that to use an Ericotone
tweeter, you need a receiver of the correct impedence. Some receivers will not reproduce
the tweeter sound. Experiment before you go sealing it up.
 |
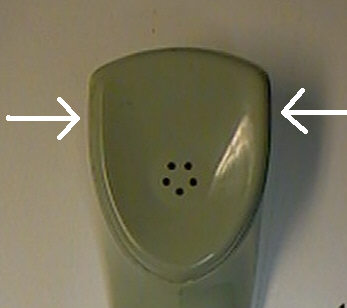
The earpiece is glued on around the perimeter of the opening. Wrap the end
of the Ericofon with a rag or soft cloth to prevent marring. Apply pressure with a C-clamp
at the points shown with the arrows. Tighten very very slowly until you hear a distinct
"crack" or "pop" sound. This is the sound of the glue breaking hold at
some point. Go any further and the next sound you hear will be that of plastic breaking! |
 |
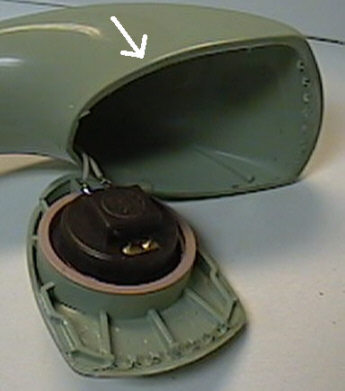
Using a very sharp knife, work your way around the
perimeter trying to find the spot that broke loose. Use the cutting edge of the knife, not
the point. Work the knife into this spot and pry up gently. Work your way around the
earpiece doing this. Since the bottom of the earpiece has a tab that hooks into the case,
you won't be able to pry this up. I recommend getting the 2 sides and top loose, then pull
outwards to break the bottom loose.
DO NOT USE A SLICING MOTION WITH THE KNIFE, IT
SLIP AND CUT YOU. Use only a prying motion.
The knife work should be done very carefully. Besides making a bloody
mess of your fingers, it can make cut marks in the casing of the phone. |
 |
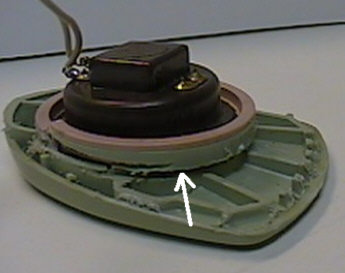
It's easier to work with the earpiece out of the case. The contact pads on
the inside of the phone are only press fitted in, so you can pop that loose and pull the
wires and all out of the case. Next, go around the perimeter of the receiver mounting
with a hacksaw blade or coping saw, cutting in about 1/8th of an inch. You won't be able
to go all the way around because of the design, but that's not necessary. About 75% of the
perimeter is enough to cut. |
 |
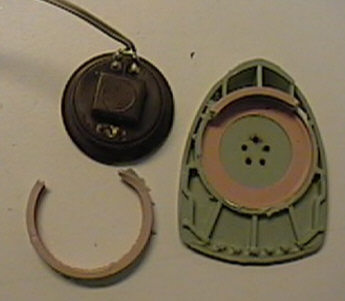
After you have taken off the part you've sawn loose, you can pry up the
receiver element. At this point, you will want to swap the wires from the old receiver to
the new one and hot glue the receiver back in place. Be careful not to short yourself on
wire length if the design of the new receiver has the terminals higher up. Carefully
glue the earpiece back on the phone with 2 part epoxy.
If the receiver element should become loose and rattle inside the case, this is easily
cured by stuffing small bits of bubble wrap up the neck of the phone, then tamping it in
place with a pencil. This will push the receiver into place and hold it there without
adding any weight to the phone.
Good luck! |
|